
Table of Contents
ToggleStep-by-Step Guide to Applying for Passport Online
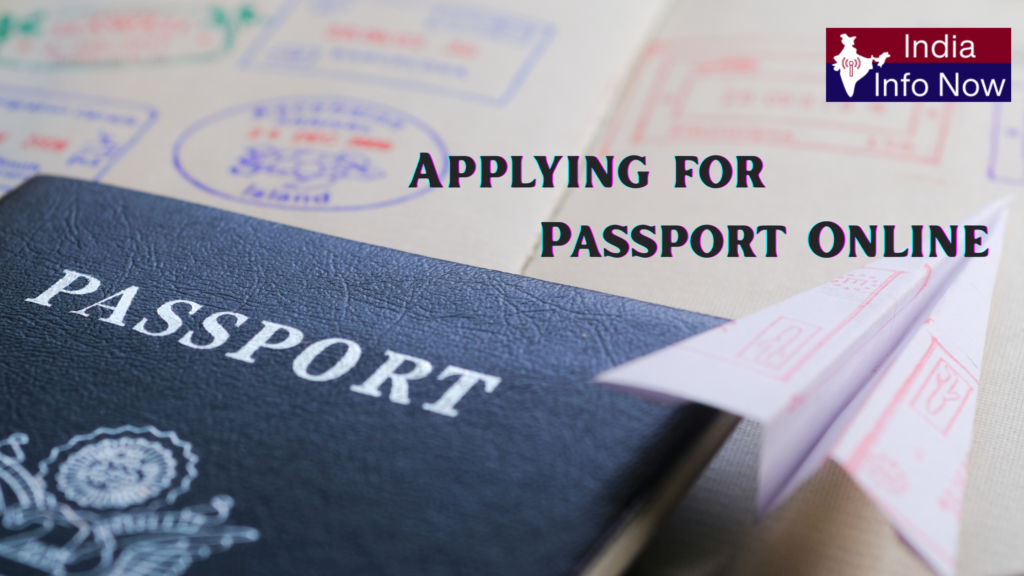
Applying for passport online has become simpler thanks to the Passport Seva Portal, which allows applicants to complete most steps online. Whether you are applying for a fresh passport or reissuing an expired one, following a structured process ensures a smooth experience. This guide explains the complete process to you.
The first step in applying for an Indian passport is to register on the official Passport Seva Portal. Registration is essential to create a secure account where you can track your application, schedule appointments, and make payments.
To register, you need the following details:
Your Passport Office, which should be based on your residential address
Full name as per your government-issued ID
Date of birth
Email ID
A preferred login ID and password
After filling in these details, click on ‘Register’. Once your account is created, you can log in anytime using your login ID and password. In case you forget your credentials, your date of birth can be used to recover access.
Step 2: Fill Out the Passport Application Form
Once your account is set up, log in and select “Apply for Fresh Passport / Re-issue of Passport.” The application form requires accurate personal and contact details.
Tips for filling the form:
Double-check all information against your official documents
Avoid spelling mistakes in your name or date of birth
Ensure that the address provided matches proof of residence
Providing correct information at this stage prevents delays or rejection of your application.
Step 3: Upload Required Documents
After filling out the application form, the next step is uploading the necessary documents. These typically include:
Identity proof (Aadhaar card, PAN card, voter ID)
Address proof
Date of birth proof (birth certificate, school records)
Educational or professional certificates (if applicable)
For added convenience and security, you can use DigiLocker for uploading documents. DigiLocker allows easy, verified access to your documents, making the submission process faster and hassle-free.
Step 4: Pay the Application Fee
The passport application fee depends on the type of passport you are applying for. Payment must be made online to schedule an appointment at the Passport Seva Kendra (PSK).
Fee Structure (as of now):
| Passport Type | Normal Fee | Tatkal Fee |
|---|---|---|
|
Fresh/Reissue (36 pages) |
₹1,500 |
₹2,000 |
|
Fresh/Reissue (60 pages) |
₹2,000 |
₹2,000 |
|
Fresh/Reissue for Minors (36 pages) |
₹1,000 |
₹2,000 |
You can make payments through:
Credit or debit cards (MasterCard, Visa)
Net banking (including SBI and other banks)
UPI payments
After payment, you will receive a confirmation along with your Application Reference Number (ARN) and Appointment Number, which can be printed or saved digitally.
Step 5: Schedule an Appointment
With the payment done, the next step is to schedule an appointment at your nearest Passport Seva Kendra (PSK) or Regional Passport Office (RPO). The portal displays available slots and dates, so booking early is recommended, especially during peak seasons.
Important points for scheduling:
You can reschedule or cancel your appointment twice if needed. Beyond that, you will need to reapply.
Choose a convenient date and time to avoid unnecessary delays.
Step 6: Visit the Passport Seva Kendra (PSK)
On the day of your appointment, visit the PSK or RPO with the original documents used for online submission. At the center, you will need to:
Submit your application
Provide biometric details (fingerprints and photograph)
Complete verification procedures
Once your documents and biometric information are successfully processed, your application moves to the next stage of verification.
Step 7: Track Your Application
After visiting the PSK, you can track the status of your passport through the Passport Seva Portal. The tracking feature lets you know:
Which counter has processed your application
If the passport has been printed and dispatched
Expected delivery date
You can stay updated without visiting the office repeatedly.
Conclusion
Applying for a passport in India is now straightforward with the Passport Seva Portal, provided you follow the steps carefully. From registering an account, filling the application, uploading documents, paying fees, scheduling an appointment, to visiting the PSK — each step must be completed accurately to avoid delays. Using services like DigiLocker and keeping track of your application online can make the process faster and more convenient.
Frequently Asked Questions
1.Can I use DigiLocker to upload documents?
Yes. DigiLocker allows secure and verified uploading of your identity, address, and birth proof documents, speeding up the verification process.
2. How do I schedule or reschedule a PSK appointment?
After submitting the application and paying the fee, log in to the portal → Select your preferred PSK → Choose a date and time. You can reschedule or cancel twice if needed.
3. What should I carry to the Passport Seva Kendra (PSK)?
Original documents submitted online
ARN (Application Reference Number) and appointment details (printed or SMS)
Passport application receipt (optional, SMS confirmation is sufficient)
4. How long does it take to receive a passport?
Normal: Approximately 30–45 days
Tatkal: 1–7 days, depending on verification
Delivery time may vary based on verification and regional office workloads.
Most Popular
-
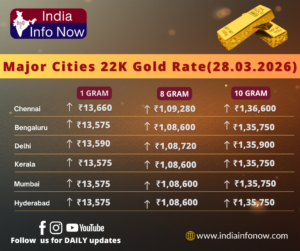 Gold Price Today (28th March 2026): 10g 24K & 22K Gold Rate in India
 -
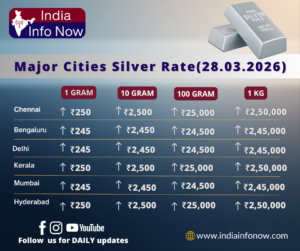 Silver Price Today (28th March 2026): 1g 10g Silver Rate in India
 -
 Silver Price Today (23rd March 2026): 1g 10g Silver Rate in India
 -
 Gold Price Today (23rd March 2026): 10g 24K & 22K Gold Rate in India
 -
 Gold Price Today (21st March 2026): 10g 24K & 22K Gold Rate in India